异步IO#
这里要说的异步IO准确的说应该叫“信号驱动的异步I/O”,也可以成为异步通知。前面两章说的阻塞和非阻塞IO,他们都是同步IO,需要应用程序不断的轮询设备是否可以被访问。而异步IO模型下,设备可被访问时,可以由驱动程序主动通知应用程序进行访问。他的形式类似于硬件层面的中断,可以理解为由软件实现的模拟中断机制。
Linux中的异步IO#
信号#
Linux系统中,使用信号来实现异步IO机制。在头文件arch/xtensa/include/uapi/asm/signal.h的34~72行定义了所有Linux系统支持的信号,相当于是中断系统中的中断号。信号的使用和中断也很想色,一个信号对应一个回掉函数,收到信号时,就会执行对应的回掉。
对于应用程序来说,信号是一种模拟中断方法,调用接口使用即可,而驱动程序则需要实现相应的方法,提供底层的支持。分别来看应用程序和驱动程序中信号的用法和实现方法。
应用程序中信号的使用#
应用程序中使用信号的步骤如下:
指定信号并指定对应的信号处理函数
使用下面的函数来选择一个信号并指定对应的信号处理函数:
sighandler_t signal(int signum, sighandler_t handler) |
参数说明:
signum:需要选择的信号,从文件arch/xtensa/include/uapi/asm/signal.h的34~72行宏定义中选一个。
handler:对应的信号处理函数。
返回值:成功返回信号的前一个处理函数,失败返回SGI_ERR。
信号处理函数sighandler_t的原型如下:
typedef void (*sighandler_t)(int) |
设置即将接收信号的进程ID
fcntl(fd, F_SETOWN, getpid()); |
fd是设备文件句柄,F_SETOWN命令表示设置将接收SIGIO或SIGURG信号的线程ID,getpid()是获取当前线程ID。
获取当前线程状态,并使它进入FASYNC状态
使用下面的方法获取当前进程状态:
flag = fcntl(fd, F_GETFL); |
flag是整型,fd是设备文件句柄,F_GETFL命令表示获取当前线程状态。
获取到当前线程状态后,在当前状态的基础上,设置进程为FASYNC状态,即开启当前线程的异步通知功能,使用下面的命令:
fcntl(fd, F_SETFL, flags | FASYNC); |
fd是设备文件句柄,F_SETFL命令表示设置当前进程状态,flag | FASYNC中flag是获取到的当前线状态,或上FASYNC即在当前的状态上增加FASYNC状态。当线程的FASYNC状态被设置时,对应驱动程序file_pperations操作函数中的fasync就会被调用。
驱动程序中信号的实现#
在驱动程序中支持信号,需要以下步骤:
在设备结构体中声明fasync_struct结构体指针:
struct xxx_dev { .….. struct fasync_struct *fasync; } |
实现fasync函数
fasync()函数的实现,一般只需将该函数的3个参数以及fasync_struct结构体指针传入fasync_helper()函数就可以了,如下:
static int xxx_fasync(int fd,struct file *filp, int mode) { struct xxx_dev *dev = filp->private_data; return fasync_helper(fd, filp, mode, &dev-> fasync); } static struct file_operations xxx_ops = { .….. .fasync = xxx_fasync, }; |
然后在release函数中调用fasync使用释放fasync_struct结构体,如下:
static int xxx_release(struct inode *inode, struct file *filp) { .….. return xxx_fasync(-1, filp, 0); } |
设备可访问时,发出信号
应用程序开启异步通知之后,就是在等待设备可操作的信号,驱动程序需要在设备可操作时发出信号,使用函数:
void kill_fasync(struct fasync_struct **fp, int sig, int band) |
参数说明:
fp:目标fasync_struct结构体变量指针的地址。
sig:发送的信号类型,范围是文件arch/xtensa/include/uapi/asm/signal.h的34~72行宏定义,需要和应用程序的需求一致。
band:设备可写时设为POLL_IN,可读时为POLL_OUT。
实验#
驱动程序在上一章的基础上,增加异步IO的实现。然后再完成对应的测试程序。
原理图#
led部分和章节 字符设备 章节相同。
key部分和 gpio输入 章节相同。
设备树#
和 gpio输入 章节相同。
驱动代码#
使用 petalinux 新建名为”ax-fasync-drv”的驱劢程序,并执行 petalinux-config -c rootfs 命令选上新增的驱动程序。
在 ax-fasync-drv.c 文件中输入下面的代码:
#include <linux/module.h>
#include <linux/kernel.h>
#include <linux/init.h>
#include <linux/types.h>
#include <linux/errno.h>
#include <linux/cdev.h>
#include <linux/of.h>
#include <linux/of_address.h>
#include <linux/of_gpio.h>
#include <linux/device.h>
#include <linux/delay.h>
#include <linux/init.h>
#include <linux/gpio.h>
#include <linux/semaphore.h>
#include <linux/timer.h>
#include <linux/of_irq.h>
#include <linux/irq.h>
#include <linux/interrupt.h>
#include <linux/sched.h>
#include <linux/wait.h>
#include <linux/poll.h>
#include <linux/fcntl.h>
#include <asm/uaccess.h>
#include <asm/mach/map.h>
#include <asm/io.h>

/* 设备节点名称 */
#define DEVICE_NAME       "fasync_led"
/* 设备号个数 */
#define DEVID_COUNT       1
/* 驱动个数 */
#define DRIVE_COUNT       1
/* 主设备号 */
#define MAJOR_U
/* 次设备号 */
#define MINOR_U           0

/* 把驱动代码中会用到的数据打包进设备结构体 */
struct alinx_char_dev {
    dev_t                devid;             //设备号
    struct cdev          cdev;              //字符设备
    struct class         *class;            //类
    struct device        *device;           //设备
    struct device_node   *nd;               //设备树的设备节点
    int                  alinx_key_gpio;    //gpio号
    atomic_t             key_sts;           //记录按键状态, 为1时被按下
    unsigned int         irq;               //中断号
    struct timer_list    timer;             //定时器
    wait_queue_head_t    wait_q_h;          //等待队列头
    struct fasync_struct *fasync;           //异步信号
};
/* 声明设备结构体 */
static struct alinx_char_dev alinx_char = {
    .cdev = {
        .owner = THIS_MODULE,
    },
};

/* 中断服务函数 */
static irqreturn_t key_handler(int irq, void *dev_in)
{
    /* 按键按下或抬起时会进入中断 */
    struct alinx_char_dev *dev = (struct alinx_char_dev *)dev_in;

    mod_timer(&dev->timer, jiffies + msecs_to_jiffies(50));
    return IRQ_RETVAL(IRQ_HANDLED);
}

/* 定时器服务函数 */
void timer_function(struct timer_list *timer)
{
    struct alinx_char_dev *dev = &alinx_char;
    /* value用于获取按键值 */
    unsigned char value;
    /* 获取按键值 */
    value = gpio_get_value(dev->alinx_key_gpio);
    if(value == 0)
    {
        /* 按键按下, 状态置1 */
        atomic_set(&dev->key_sts, 1);
        /* fasync有没有初始化过 */
        if(dev->fasync)
        {
            /* 初始化过说明应用程序调用过 */
            kill_fasync(&dev->fasync, SIGIO, POLL_OUT);
        }
        else if((current->__state & TASK_INTERRUPTIBLE) != 0)
        {
            /* 是等待队列,需要唤醒进程 */
            wake_up_interruptible(&dev->wait_q_h);
        }
        else
        {
            /* do nothing */
        }
    }
    else
    {
        /* 按键抬起 */
    }
}

/* open函数实现, 对应到Linux系统调用函数的open函数 */
static int char_drv_open(struct inode *inode_p, struct file *file_p)
{
    printk("gpio_test module open\n");
    file_p->private_data = &alinx_char;
    return 0;
}

/* read函数实现, 对应到Linux系统调用函数的write函数 */
static ssize_t char_drv_read(struct file *file_p, char __user *buf, size_t len, loff_t *loff_t_p)
{
    unsigned int keysts = 0;
    int ret;

    struct alinx_char_dev *dev = (struct alinx_char_dev *)file_p->private_data;

    /* 读取key的状态 */
    keysts = atomic_read(&dev->key_sts);
    /* 判断文件打开方式 */
    if(file_p->f_flags & O_NONBLOCK)
    {
        /* 如果是非阻塞访问, 说明已满足读取条件 */
    }
    /* 判断当前按键状态 */
    else if(!keysts)
    {
        /* 按键未被按下(数据未准备好) */
        /* 以当前进程创建并初始化为队列项 */
        DECLARE_WAITQUEUE(queue_mem, current);
        /* 把当前进程的队列项添加到队列头 */
        add_wait_queue(&dev->wait_q_h, &queue_mem);
        /* 设置当前进成为可被信号打断的状态 */
        __set_current_state(TASK_INTERRUPTIBLE);
        /* 切换进程, 是当前进程休眠 */
        schedule();

        /* 被唤醒, 修改当前进程状态为RUNNING */
        set_current_state(TASK_RUNNING);
        /* 把当前进程的队列项从队列头中删除 */
        remove_wait_queue(&dev->wait_q_h, &queue_mem);

        /* 判断是否是被信号唤醒 */
        if(signal_pending(current))
        {
            /* 如果是直接返回错误 */
            return -ERESTARTSYS;
        }
        else
        {
            /* 被按键唤醒 */
        }
    }
    else
    {
        /* 按键被按下(数据准备好了) */
    }

    /* 读取key的状态 */
    keysts = atomic_read(&dev->key_sts);
    /* 返回按键状态值 */
    ret = copy_to_user(buf, &keysts, sizeof(keysts));
    /* 清除按键状态 */
    atomic_set(&dev->key_sts, 0);
    return 0;
}

/* poll函数实现 */
unsigned int char_drv_poll(struct file *file_p, struct poll_table_struct *wait)
{
    unsigned int ret = 0;

    struct alinx_char_dev *dev = (struct alinx_char_dev *)file_p->private_data;

    /* 将应用程序添添加到等待队列中 */
    poll_wait(file_p, &dev->wait_q_h, wait);

    /* 判断key的状态 */
    if(atomic_read(&dev->key_sts))
    {
        /* key准备好了, 返回数据可读 */
        ret = POLLIN;
    }
    else
    {

    }

    return ret;
}

/* fasync函数实现 */
static int char_drv_fasync(int fd,struct file *file_p, int mode)
{
    struct alinx_char_dev *dev = (struct alinx_char_dev *)file_p->private_data;
    return fasync_helper(fd, file_p, mode, &dev->fasync);
}

/* release函数实现, 对应到Linux系统调用函数的close函数 */
static int char_drv_release(struct inode *inode_p, struct file *file_p)
{
    printk("gpio_test module release\n");
    return char_drv_fasync(-1, file_p, 0);
}

/* file_operations结构体声明, 是上面open、write实现函数与系统调用函数对应的关键 */
static struct file_operations ax_char_fops = {
    .owner   = THIS_MODULE,
    .open    = char_drv_open,
    .read    = char_drv_read,
    .poll    = char_drv_poll,
    .fasync  = char_drv_fasync,
    .release = char_drv_release,
};

/* 模块加载时会调用的函数 */
static int __init char_drv_init(void)
{
    /* 用于接受返回值 */
    u32 ret = 0;

    /* 初始化原子变量 */
    atomic_set(&alinx_char.key_sts, 0);

    /* 获取设备节点 */
    alinx_char.nd = of_find_node_by_path("/alinxkey");
    if(alinx_char.nd == NULL)
    {
        printk("alinx_char node not find\r\n");
        return -EINVAL;
    }
    else
    {
        printk("alinx_char node find\r\n");
    }

    /* 获取节点中gpio标号 */
    alinx_char.alinx_key_gpio = of_get_named_gpio(alinx_char.nd, "alinxkey-gpios", 0);
    if(alinx_char.alinx_key_gpio < 0)
    {
        printk("can not get alinxkey-gpios");
        return -EINVAL;
    }
    printk("alinxkey-gpio num = %d\r\n", alinx_char.alinx_key_gpio);

    /* 申请gpio标号对应的引脚 */
    ret = gpio_request(alinx_char.alinx_key_gpio, "alinxkey");
    if(ret != 0)
    {
        printk("can not request gpio\r\n");
        return -EINVAL;
    }

    /* 把这个io设置为输入 */
    ret = gpio_direction_input(alinx_char.alinx_key_gpio);
    if(ret < 0)
    {
        printk("can not set gpio\r\n");
        return -EINVAL;
    }

    /* 获取中断号 */
    alinx_char.irq = gpio_to_irq(alinx_char.alinx_key_gpio);
    /* 申请中断 */
    ret = request_irq(alinx_char.irq,
                      key_handler,
                      IRQF_TRIGGER_FALLING | IRQF_TRIGGER_RISING,
                      "alinxkey",
                      &alinx_char);
    if(ret < 0)
    {
        printk("irq %d request failed\r\n", alinx_char.irq);
        return -EFAULT;
    }

    __init_timer(&alinx_char.timer, timer_function, 0);

    init_waitqueue_head(&alinx_char.wait_q_h);

    /* 注册设备号 */
    alloc_chrdev_region(&alinx_char.devid, MINOR_U, DEVID_COUNT, DEVICE_NAME);

    /* 初始化字符设备结构体 */
    cdev_init(&alinx_char.cdev, &ax_char_fops);

    /* 注册字符设备 */
    cdev_add(&alinx_char.cdev, alinx_char.devid, DRIVE_COUNT);

    /* 创建类 */
    alinx_char.class = class_create(THIS_MODULE, DEVICE_NAME);
    if(IS_ERR(alinx_char.class))
    {
        return PTR_ERR(alinx_char.class);
    }

    /* 创建设备节点 */
    alinx_char.device = device_create(alinx_char.class, NULL,
                                      alinx_char.devid, NULL,
                                      DEVICE_NAME);
    if (IS_ERR(alinx_char.device))
    {
        return PTR_ERR(alinx_char.device);
    }

    return 0;
}

/* 卸载模块 */
static void __exit char_drv_exit(void)
{
    /* 释放gpio */
    gpio_free(alinx_char.alinx_key_gpio);

    /* 释放中断 */
    free_irq(alinx_char.irq, NULL);

    /* 删除定时器 */
    del_timer_sync(&alinx_char.timer);

    /* 注销字符设备 */
    cdev_del(&alinx_char.cdev);

    /* 注销设备号 */
    unregister_chrdev_region(alinx_char.devid, DEVID_COUNT);

    /* 删除设备节点 */
    device_destroy(alinx_char.class, alinx_char.devid);

    /* 删除类 */
    class_destroy(alinx_char.class);

    printk("timer_led_dev_exit_ok\n");
}

/* 标记加载、卸载函数 */
module_init(char_drv_init);
module_exit(char_drv_exit);

/* 驱动描述信息 */
MODULE_AUTHOR("Alinx");
MODULE_ALIAS("alinx char");
MODULE_DESCRIPTION("FASYNC LED driver");
MODULE_VERSION("v1.0");
MODULE_LICENSE("GPL");
21行添加头文件linux/fcntl.h。
49行添加fasync_struct结构体到设备结构体中。
82行在定时器的处理函数中,确认按键按下后,先判断fasync_struct结构体有没有初始化过,初始化过说明调用过fasync函数,也就是应用程序是能了异步通知,所以就发送对应的信号。
204~208行实现fasync函数,里面就是简单的调用了fasync_helper来初始化fasync_struct结构体。
204行在release函数中调用fasync函数,释放fasync_struct结构体。
213行把我们实现的fasync函数添加到file_operations结构体中。
另外,相比较上一章,这章里面使用了私有数据来代替设备结构体变量的全局变量,具体的用法说明,可以回顾一下第一章的实验代码里的解释。
注意270行中断的服务函数输入参数设置和64行定时器的服务函数输入参数设置。
测试代码#
新建QT工程名为”ax_fasync_test”,新建main.c,输入下列代码:
#include "stdio.h"
#include "unistd.h"
#include "sys/types.h"
#include "sys/stat.h"
#include "fcntl.h"
#include "stdlib.h"
#include "string.h"
#include "poll.h"
#include "sys/select.h"
#include "sys/time.h"
#include "linux/ioctl.h"
#include "signal.h"

static int fd = 0, fd_l = 0;

static void sigio_signal_func()
{
    int ret = 0;
    static char led_value = 0;
    unsigned int key_value;

    /* 获取按键状态 */
    ret = read(fd, &key_value, sizeof(key_value));
    if(ret < 0)
    {
        printf("read failed\r\n");
    }

    /* 判断按键状态 */
    if(1 == key_value)
    {
        /* 按键被按下,改变吗led状态 */
        printf("ps_key1 press\r\n");
        led_value = !led_value;

        fd_l = open("/dev/gpio_leds", O_RDWR);
        if(fd_l < 0)
        {
            printf("file /dev/gpio_leds open failed\r\n");
        }

        ret = write(fd_l, &led_value, sizeof(led_value));
        if(ret < 0)
        {
            printf("write failed\r\n");
        }

        ret = close(fd_l);
        if(ret < 0)
        {
            printf("file /dev/gpio_leds close failed\r\n");
        }
    }
}

int main(int argc, char *argv[])
{
    int flags = 0;
    char *filename;

    if(argc != 2)
    {
        printf("wrong para\n");
        return -1;
    }

    filename = argv[1];
    fd = open(filename, O_RDWR);
    if(fd < 0)
    {
        printf("can not open file %s\r\n", filename);
        return -1;
    }

    /* 指定信号SIGIO,并绑定处理函数 */
    signal(SIGIO, sigio_signal_func);
    /* 把当前线程指定为将接收信号的进程 */
    fcntl(fd, F_SETOWN, getpid());
    /* 获取当前线程状态 */
    flags = fcntl(fd, F_GETFD);
    /* 设置当前线程为FASYNC状态 */
    fcntl(fd, F_SETFL, flags | FASYNC);

    while(1)
    {
        sleep(2);
    }

    close(fd);
    return 0;
}
注意19行给led_value加上static。
75~82行就是按照异步IO章节中说的步骤操作即可,不重复解释了。
运行测试#
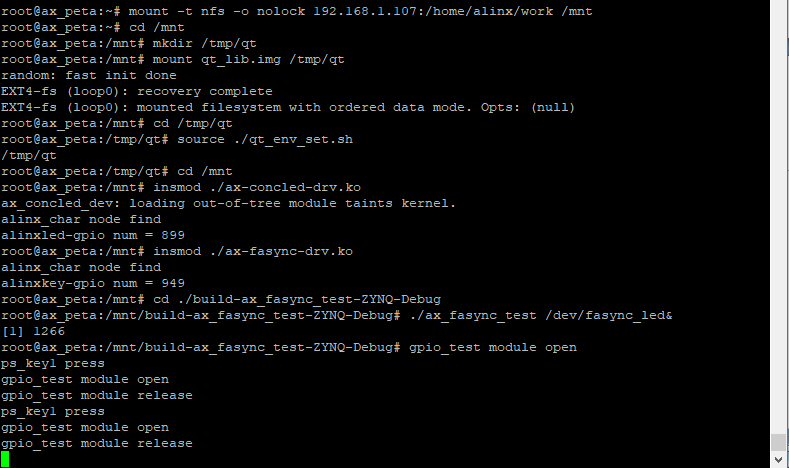
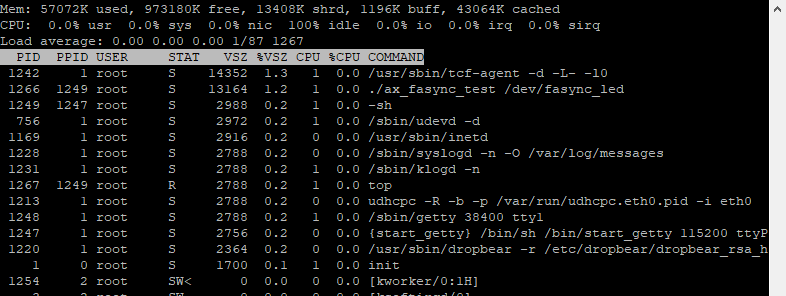
测试方式和现象和上一章一样,步骤如下:
mount -t nfs -o nolock 192.168.1.107:/home/alinx/work /mnt cd /mnt mkdir /tmp/qt mount qt_lib.img /tmp/qt cd /tmp/qt source ./qt_env_set.sh cd /mnt insmod ./ax-concled-drv.ko insmod ./ax-fasync-drv.ko cd ./build-ax_fasync_test-ZYNQ-Debug ./ax_fasync_test /dev/fasync_led& top |
结果如下图: